
A gentle introduction to CocoTb
ANNOUNCEMENT: Now you can access an FPGA LAB environment on demand with chiprentals. This service is currently in the Beta stage and is being provided for free. Go perform your projects in a real world environment. Book your slot here. The PYNQ-Z2 board being offered currently is the best choice for trying out ML and AI acceleration projects as well as traditional FPGA development.
Verification of digital logic has always been an area that is very painful to get started with. It has a high barrier to entry in the form of involved and intricate frameworks like UVM etc that everyone seems to despise and heavy tools that cost crazy amounts to acquire. Additionally, there is so little information available about these tools and frameworks out in the open, that too many people just get intimidated by the task.
What I have realized during my time as a digital design engineer is that an easy to use verification methodology that enables you to write and run some simple tests very quickly can significantly boost the quality of your code and greatly reduce the time it takes to make your modules robust and error free.
In my search for quick and easy ways to write automated testbenches for my verilog modules, I developed this method for testing code. Despite the power it gave me, it still needed a more than optimal amount of effort owing to the fact that you still need to write a HDL testbench that interfaces with the module for you. It is still good enough when you have a simple 'give input take output' kinda module but it can get very messy when complicated stuff like bus transactions are involved.
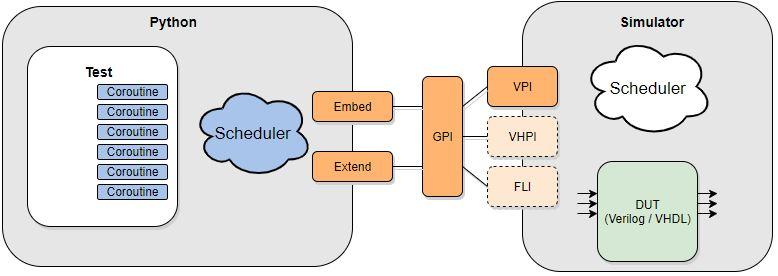
My search for the perfect verification framework led me to Cocotb which is essentially a python framework that automatically interfaces with several HDL simulators (like Icarus, Modelsim, Questasim etc) and allows you to drive the signals in your design directly from python itself. With this, your entire testbench can be written in python and automation and randomization can be easily taken care of thus boosting your productivity.
Probably the strongest point of cocotb is that it allows one to manipulate the signals inside your module from a 'normal' language aka a Non-HDL. This is a gift because when you have designs that implement complex algorithms and computation structures in hardware, a HDL based testbench would require you to write the golden model of this complex algorithm in a HDL and I think you see why it can be a nightmare. It is going to take so much time to be sure that your golden model is perfect, let alone test the DUT. Python on the other hand, has probably the largest collection of libraries and functions that implement a plethora of algorithms in the most efficient and robust methods. Moreover, these libraries are vetted and constatly scrutinized by a hyperactive software-dev community that is much much larger than the one we have for digital design.
In this article, we'll take a look at what cocotb is all about and why so many people are excited about it. We'll write some good automated testbenches to understand the cocotb way of thinking. In the next article, I'll explore the most powerful and more involved features of cocotb that really give you ablities to achieve the level of coverage that methods like UVM, formal verification etc can achieve.
So let's dig into this!
First, a little bit of Python:
If you're like me, you spend most of your time doing digital design with HDLs or working on static timing analysis or maybe directly on hardware. But you also have a scripting language that you commonly use to automate the repetitive stuff or do something simple but laborious like parsing reports from tools etc. And chances are this scripting language of your choice is python, given its simplicity and power. It could also be something like TCL or perl or quite commonly bash itself, but more often than not you've used python sometime or another.
In such a case, you probably only know the basic elements of the python language and heavily borrow (read copy and paste) from stack overflow whenever you need to write a script. Cocotb however, uses some fancy features in the python programming language that are usually unseen in regular software code. While it is not important for you (as a digital design / hardware /verification engineer) to know the exact details of all these features, it helps to expand your mental model of python so that you can attempt to write more powerful and imaginative test scenarios for every testbench you write using cocotb.
Here's some terminology that you need to get used to -
coroutines - They are used for cooperative multitasking where processes can voluntarily yield (give away) control periodically (or when idle) in order to allow other processes to run. Coroutines are usually declared using the 'async def' keywords which basically tell the interpreter that it is an asynchronous function. This scheme is widely used in Cocotb to model the inherent parallelism of hardware.
NOTE: The same can be done with a @cocotb.coroutine decorator, but you are advised not to use it as it is depreciated. I'm putting this note here so that any legacy code doesn't confuse you.
async functions - They cannot be called directly, they either have to be awaited or passed to an event loop ( a program that manages asynchrony and schedules async functions). to await a function means to pause the current function and let the awaited function progress by scheduling it in the event loop.
NOTE: Don't use the yield keyword, its deprecated. Use await.
eg. await Timer(10,'ns') means to pause the current coroutine and let the simulator time (being accessed via Timer coroutine here) move forward by 10ns. Once that is done, the current coroutine resumes execution.
decorators - A decorator is just a function that takes another function as an argument, adds some kind of functionality, and then returns another function.
@decorator_function
def my_dumb_function():
		...........
		...........

# The above code is equivalent to:
my_dumb_function = decorator_function(my_dumb_function)
Some commonly used decorators in cocotb are
- @cocotb.test - This marks the coroutine as a cocotb test to be run. It also adds additional functionality like reporting, logging , timeout , expected fail flags etc to the coroutine despite the user not writing any of these features explicitly. Marking a function as a test using this coroutine is enough for cocotb to automatically pick up and run the test.
- @cocotb.coroutine(OUTDATED) - Marks the function and adds some generic logging capabilities to the user defined coroutine. I have included this here to help you understand older Cocotb code but as of now, you can directly use 'async def' functions in stead of @cocotb.coroutine
generators - A type of python function that executes in steps as and when it is called instead of processing an entire set of data at once. This is a very useful feature of python that lets us write efficient code that does not waste resources. To visualize a generator function, think of the ink stamp that consists of a number on the stamp and increments the number each time you use the stamp.
Generators can be used to mimic hardware by creating infinite data generators, i.e as long as the clock is running, the generator will output some data each time it is called.
Some cocotb specific keywords:
dut - a default object pointing to the top level module instance built-into cocotb.
trigger - Something that can be used to indicate a condition and take action, the simulator usually paused or started based on triggers. eg. Timer, RisingEdge
result - a reporting mechanism eg. TestFailure, assertion etc
Scoreboard - The Scoreboard is a built-in cocotb class that is used to compare the actual outputs to expected outputs. Monitors are added to the scoreboard for the actual outputs, and the expected outputs can be either a simple list, or a function that provides a transaction.
Testfactory - A provision in cocotb that enables us to randomize the test stimulus by modifying all the possible 'test knobs' in all the possible permutations. This, I believe is one of the most powerful features of cocotb since it saves lots of time that would have been needed to write individual tests for each possible configuration. However, this does not let us modify the parameters declarations and conditional compilation flags in our verilog module, but there is a way around that as we'll see further.
Logging - A facility used to generate meaningful and helpful logs and messages that aid in debugging later.
monitors - built in cocotb classes that can observe the a certain signals of a particular interface and enable scoreboarding, logging and other features on those signals.
drivers - Input generating functions that can continuously create input stimulus in the required format.
The setup:
Cocotb works both with linux as well as windows. In my case, I'm using the development version of Cocotb directly built from the source on Windows, in tandem with Icarus Verilog for windows. This also comes with the 'Gtkwave' waverform viewer tool that makes it effortless to check the waveforms without having to use some bulky IDE.
NOTE: If you're using windows, it is advised to use the Anaconda environment manager. Otherwise your life could become miserable. More installation instructions can be found at the official documentation.
There are a few elements required for a cocotb testbench:
- The Makefile
- The test module (python file)
- The HDL files
I like the fact that Cocotb uses a Make based flow. It is really a good practice and encourages code reuse by making it easier to call modules from all over your filesystem instead of making a different version of every module inside every project. It also helps when you have different versions of modules with similar names and functionalities, since the path to the Verilog files is mentioned in the Makefiles. This might look like an overkill for hobbyists just trying to get their little project done but most companies use some form of setup that mimics this flow and hence is a useful habit to develop.
Another good practice is to maintain a proper folder structure to separate your HDL source files from your test files which may include HDL testbenches, python files or the waveform/log files generated during simulation runs. Here is what I'm using:
mac_manual
└───hdl
│   │   mac_manual.v
│   │   qadd.v
|   |   qmult.v
│
└───tests
    │   Makefile
    |   test_mac_manual.py
    |   results.xml
    |   mac_manual_cocotb.vcd
The HDL:
If you're coming here directly and need a motivation for the module under test here, it is a fixed point MAC (Multiply and Accumulate) unit that I had designed here for adding fixed point arithmetic capabilities to the convolutional neural network project of mine. That article can be found here.
In a previous article, as mentioned above, I had tested this module using python to generate inputs and run the simulator via OS commands. Here is the top module for reference:
//file: mac_manual.v

module mac_manual #(parameter N = 16,parameter Q = 12)(
    input clk,sclr,ce,
    input [N-1:0] a,
    input [N-1:0] b,
    input [N-1:0] c,
    output [N-1:0] p
    );

`ifdef FIXED_POINT
    wire [N-1:0] mult,add;
    reg [N-1:0] tmp;
    wire ovr;
    qmult #(N,Q) mul (            //fixed point multiplier
                .clk(clk),
                .rst(sclr),
                .a(a),
                .b(b),
                .q_result(mult),
                .overflow(ovr)
                );
    qadd #(N,Q) add1 (            //fixed point adder
                .a(mult),
                .b(c),
                .c(add)
                );

    always@(posedge clk,posedge sclr)
           begin
               if(sclr)
               begin
                   tmp <= 0;
               end
               else if(ce)
               begin
                   tmp <= add;
               end
           end
           assign p = tmp;
`else
    reg [N-1:0] temp;
    always@(posedge clk,posedge sclr)
    begin
        if(sclr)
        begin
            temp <= 0;
        end
        else if(ce)
        begin
            temp <= (a*b+c);
        end
    end
    assign p = temp;
 `endif

initial begin
  $dumpfile("mac_manual_cocotb.vcd");   //waveform dumps for visualization
  $dumpvars(0,mac_manual);
end

endmodule
The Makefile:
Here is how the Makefile looks for our testbench:
#file: Makefile
CWD=$(shell pwd)

TOPLEVEL_LANG ?=verilog
SIM ?= icarus

#Paths to HDL source files
ifeq ($(TOPLEVEL_LANG),verilog)
  VERILOG_SOURCES =$(CWD)/../hdl/mac_manual.v
  VERILOG_SOURCES +=$(CWD)/../hdl/qmult.v
  VERILOG_SOURCES +=$(CWD)/../hdl/qadd.v
else
  $(error "A valid value (verilog) was not provided for TOPLEVEL_LANG=$(TOPLEVEL_LANG)")
endif

DUT      = mac_manual         #module under test
TOPLEVEL = $(DUT)             #top module
MODULE := my_example_cocotb   #python testbench file
COCOTB_HDL_TIMEUNIT=1us
COCOTB_HDL_TIMEPRECISION=1us

CUSTOM_SIM_DEPS=$(CWD)/Makefile

ifeq ($(SIM),questa)
    SIM_ARGS=-t 1ps
endif

ifeq ($(SIM),icarus)
    COMPILE_ARGS += -DFIXED_POINT  #Any extra arguments to the iverilog
								#command can be placed here. Any parameters
								#in the verilog module can be overriden from
                                   #here as well. However, they cannot be change
                                   #during runtime.
endif

ifneq ($(filter $(SIM),ius xcelium))
    SIM_ARGS += -v93
endif

include $(shell cocotb-config --makefiles)/Makefile.sim
The COCOTB testbench:
Cocotb does not specify how you should write a testbench. However, there are lots of examples in its official repository and they give you an idea of how to go about writing an automated testbench using cocotb.
Also, some very good projects in the opensource world have started using cocotb for their verification and that gives us starting points to work from. This is one such repository by alexforencich. We'll be taking the template from the testbenches in this project and also from the examples given in the official repository here.
Let's take a look at the testbench I wrote for the 'mac_manual' module that we tested in the last article. If you're coming here directly and need a motivation for the module under test here, it is a fixed point MAC (Multiply and Accumulate) unit that I had designed here for adding fixed point arithmetic capabilities to the convolutional neural network project of mine.
Here we're writing only a basic test that creates and passes one set of inputs (a,b,c) and checks the output P against the golden value. All this purely via python!
#file:test_mac_manual.py

#cocotb related imports
import cocotb
from cocotb.clock import Clock
from cocotb.triggers import RisingEdge, Timer
from cocotb.regression import TestFactory
import logging
import random

#imports needed for our functions
import numpy as np
import os
import math

#We create this TB object in every test so that all the required functions can be accessed
#from within this class.

class TB(object):
#The init method of this class can be used to do some setup like logging etc, start the
#toggling of the clock and also initialize the internal to their pre-reset vlaue.
    def __init__(self, dut):
        self.dut = dut
        self.log = logging.getLogger('cocotb_tb')
        self.log.setLevel(logging.DEBUG)

				#start the clock as a parallel process.
        cocotb.fork(Clock(dut.clk, 10, units="us").start())

#Some function definitions for format conversions. Same as the ones in the previous article
#NOTE: every supporting function you define inside the TB class should have 'self' as an input parameter, otherwise you'll get an number of parameters error.

    def fp_to_float(self, s, integer_precision, fraction_precision):  # s = input binary string
        number = 0.0
        i = integer_precision - 1
        j = 0
        if(s[0] == '1'):
            s_complemented = self.twos_comp(
                (s[1:]), integer_precision, fraction_precision)
        else:
            s_complemented = s[1:]
        while(j != integer_precision + fraction_precision - 1):
            number += int(s_complemented[j]) * (2**i)
            i -= 1
            j += 1
        if(s[0] == '1'):
            return (-1) * number
        else:
            return number

    def float_to_fp (self, num, integer_precision, fraction_precision):
        if(num < 0):
            sign_bit = 1  # sign bit is 1 for negative numbers in 2's complement representation
            num = -1 * num
        else:
            sign_bit = 0
        precision = '0' + str(integer_precision) + 'b'
        integral_part = format(int(num), precision)
        fractional_part_f = num - int(num)
        fractional_part = []
        for i in range(fraction_precision):
            d = fractional_part_f * 2
            fractional_part_f = d - int(d)
            fractional_part.append(int(d))
        fraction_string = ''.join(str(e) for e in fractional_part)
        if(sign_bit == 1):
            binary = str(sign_bit) + self.twos_comp(integral_part +
                                               fraction_string, integer_precision, fraction_precision)
        else:
            binary = str(sign_bit) + integral_part + fraction_string
        return str(binary)

    def twos_comp(self, val, integer_precision, fraction_precision):
        flipped = ''.join(str(1 - int(x))for x in val)
        length = '0' + str(integer_precision + fraction_precision) + 'b'
        bin_literal = format((int(flipped, 2) + 1), length)
        return bin_literal

    def truncate(self, number, digits) -> float:
        stepper = 10.0 ** digits
        return math.trunc(stepper * number) / stepper

	  #Note the 'async def' keyword here. It means that this is a coroutine that needs to
	  #be awaited.
    async def cycle_reset(self):
        self.dut.sclr.setimmediatevalue(0)
        await RisingEdge(self.dut.clk)
        await RisingEdge(self.dut.clk)
        self.dut.sclr <= 1                 #This is how cocotb lets you control the value of any
        								#signal inside the design
        await RisingEdge(self.dut.clk)
        await RisingEdge(self.dut.clk)
        self.dut.sclr <= 0
        await RisingEdge(self.dut.clk)
        await RisingEdge(self.dut.clk)

@cocotb.test()        #decorator indicates that this is a test that needs to be run by cocotb.
async def test1(dut): #dut is a pointer to the top module. This is built in
    tb = TB(dut)      #creating a testbench object for this dut. __init__ function is run automatically
    await Timer(1)    #pauses current function and lets the simulator run for 1 time step.
                      #duration of each timestep is determined by the parameter                                             #COCOTB_HDL_TIMEPRECISION in the makefile
    N = int(os.environ.get('PARAM_N','16')) #here '16 is the default value of N parameter'
    Q = int(os.environ.get('PARAM_Q','12')) #default value of Q = 12
    I = N - Q - 1

    tb.dut._log.info('resetting the module') #logging helpful messages

    await tb.cycle_reset() #running the cycle_reset corouting defined above

	tb.dut._log.info('out of reset')

    a = np.random.uniform(-0.5, 0.5, 1)
    b = np.random.uniform(-0.5, 0.5, 1)
    c = np.random.uniform(-0.5, 0.5, 1)

    p_golden = a[0] * b[0] + c[0]
    p_golden_trunc = tb.truncate(p_golden, 2)

    a_fp = tb.float_to_fp(a[0], I, Q)
    b_fp = tb.float_to_fp(b[0], I, Q)
    c_fp = tb.float_to_fp(c[0], I, Q)

    await RisingEdge(dut.clk)           #waiting a clock cycle RisingEdge(dut.clk) is equivalent
                                        #to '@posedge' clk in verilog
    tb.dut.a.value = int(a_fp,2)
    tb.dut.b.value = int(b_fp,2)
    tb.dut.c.value = int(c_fp,2)

    tb.dut.ce.value = 1                    #setting clock enable to 1

    await RisingEdge(dut.clk)
    await RisingEdge(dut.clk)

    practical_op = tb.truncate(tb.fp_to_float(str(tb.dut.p.value),I,Q),2)

	  #this assert statement checks the module's output against the golden value and
	  #raises a test failure exception if the don't match
    assert practical_op == p_golden_trunc, "Adder result is incorrect: {} != {}".format(practical_op, p_golden)
NOTE: We occasionally see the use of '<=' for signal assignment and '=' for the rest. This might confuse you into relating it to the blocking and non-blocking assignments in Verilog, except there is no such thing in Cocotb. The simulator needs to be stopped anyway to assign new values. Both above operators give the same results. To quote a snipped from a discussion on the official Cocotb repository:
#There is no difference between all next assignments, except last one which doesn't really work.
@cocotb.test()
def parallel_example(dut):
    reset_n = dut.reset
    dut.reset = 1        # OK
    dut.reset <= 1       # OK hdl-like shortcut for the next one
    dut.reset.value = 1  # OK
    reset_n <= 1         # OK
    reset_n.value = 1    # OK
    reset_n = 1          # Doesn't work: reference overwrite
Now we can run this testbench via the Makefile. Just cd into the tests folder and type 'make' you should see a huge log being printed. It should also show you the result of the tests that you've written.
make results.xml
make[1]: Entering directory '/d/cocotb_files/cocotb/examples/my_example/tests'
MODULE=test_my_example_cocotb TESTCASE= TOPLEVEL=mac_manual TOPLEVEL_LANG=verilog \
 /c/iverilog/bin/vvp -M C:/programdata/miniconda3/lib/site-packages/cocotb/libs -m libcocotbvpi_icarus
sim_build/sim.vvp -.--ns INFO     cocotb.gpi..mbed\gpi_embed.cpp:77
in set_program_name_in_venv
Did not detect Python virtual environment. Using system-wide Python interpreter -.--ns INFOcocotb.gpi.\gpi\GpiCommon.cpp:105  in gpi_print_registered_impl       VPI registered-.--ns INFO   cocotb.gpi..mbed\gpi_embed.cpp:240  in _embed_sim_init
Python interpreter initialized and cocotb loaded!                                                 0.00ns
←[34mINFO
←[49m←[39m cocotb__init__.py:220  in _initialise_testbench_
←[34mRunning on Icarus Verilog version 12.0 (devel)
←[49m←[39m0.00ns
←[34mINFO
←[49m←[39m cocotb__init__.py:226  in _initialise_testbench_
←[34mRunning tests with cocotb v1.5.0 from C:\programdata\miniconda3\lib\site-packages\cocotb
←[49m←[39m 0.00ns
←[34mINFO
←[49m←[39m cocotb__init__.py:247 in _initialise_testbench_
←[34mSeeding Python random module with 1616340035
←[49m←[39m0.00ns
←[34mINFO
←[49m←[39m cocotb.regression regression.py:127  in __init__
←[34mFound test test_my_example_cocotb.test1_001
←[49m←[39m0.00ns
←[34mINFO←[49m←[39m cocotb.regression regression.py:468  in _start_test
←[34m←[44m←[30mRunning test 1/1:
←[49m←[39m test1_001
←[49m←[39m0.00ns
←[34mINFO
←[49m←[39m cocotb.test.test1_001.0x23827039610       decorators.py:312  in _advance
←[34mStarting test: "test1_001"
←[49m←[39m←[34mDescription: Automatically generated test
←[49m←[39m←[34m←[49m←[39m←[34m←[49m←[39mVCD info: dumpfile mac_manual_cocotb.vcd opened for output.
←[34mINFO
←[49m←[39m cocotb.mac_manual.._example_cocotb.py:108  in test1                           ←[34mresetting the module                    <<<<<---- OUR LOG MESSAGES
←[49m←[39m 60000.00ns
←[34mINFO
←[49m←[39m cocotb.mac_manual.._example_cocotb.py:110  in test1
←[34mout of reset
←[49m←[39m
90000.00ns
←[34mINFO
←[49m←[39m cocotb.regression regression.py:364  in _score_test
←[34mTest Passed: test1_001
←[49m←[39m 90000.00ns
←[34mINFO
←[49m←[39m cocotb.regression regression.py:487  in _log_test_summary
←[34mPassed 1 tests (0 skipped)
←[49m←[39m 90000.00ns
←[34mINFO
←[49m←[39m cocotb.regression regression.py:557  in _log_test_summary               ←[34m******************************************************************************************
←[49m←[39m
←[34m**             TEST                 PASS/FAIL  SIM TIME(NS)  REAL TIME(S)  RATIO(NS/S) **
←[49m←[39m                                     ←[34m******************************************************************************************
←[49m←[39m                                                                                           ←[34m** test_my_example_cocotb.test1_001    PASS        90000.00          0.01   7083377.70 **
←[49m←[39m                     ←[34m******************************************************************************************
←[49m←[39m                                                                                           ←[34m←[49m←[39m 90000.00ns
←[34mINFO
←[49m←[39m cocotb.regression regression.py:574  in _log_sim_summary               ←[34m*************************************************************************************
←[49m←[39m ←[34m**ERRORS : 0**
←[49m←[39m←[34m*************************************************************************************
←[49m←[39m  ←[34m**SIM TIME : 90000.00 NS**
←[49m←[39m←[34m**REAL TIME : 0.34 S**
←[49m←[39m←[34m** SIM / REAL TIME : 265625.54 NS/S**
←[49m←[39m ←[34m*************************************************************************************
←[49m←[39m ←[34m←[49m←[39m                                                       90000.00ns
←[34mINFO    ←[49m←[39m cocotb.regression     regression.py:259  in tear_down                       ←[34mShutting down...
←[49m←[39mmake[1]: Leaving directory '/d/cocotb_files/cocotb/examples/my_example/tests'
However, despite all this power, there's one important thing we're still missing. Take a look at the code and you'll see that we have a couple of parameters 'N' and 'Q' that we use to represent the total number of bits used to represent each number and the number of fractional bits among them. During this test, the values of these parameters were fixed to (N,Q) = (16,12). I mean you can still change it via the makefile wherein they have been overridden by passing them as arguments to the 'iverilog' command. But what this means is that you cannot change the parameters between tests or within a test. This can be very limiting because checking with several possible combinations of parameters is an integral part of verifying highly parameterized code (which good code usually is). We need to make sure that everything works in every configuration. Of course you can re-run the test for each configuration of parameters but turns out there's an even better way to automate this stuff.
In comes Cocotb-test!
Cocotb-test is another python framework built around pytest, which is a unit testing framework very commonly used by python developers. What this enables us to do is run multiple versions of the same test, each time varying some parameter of the configuration by setting them as local environment variables that can be picked up by the Makefile before each test run begins. To simplify, pytest acts like a wrapper around our cocotb testbench and sets it up with different environment variables for each test.
This way, we can give pytest all the possible values of each parameter that we'd like to vary and it will generate tests for all the possible combinations of these modules. Then we can easily check which combination fails.
Lets add this ability to our testbench above...
Before that we'll need to do just one more bit of setup. Pytest requires a tox.ini file that it uses to figure out stuff like the directory structure and python version among other things. Here is the .ini file that I'm using
#fiel: tox.ini

# tox configuration
[tox]
envlist = py39
skipsdist = True

[gh-actions]
python =
    3.9: py39

[testenv]
deps =
    pytest
    pytest-xdist
    pytest-split
    cocotb
    cocotb-test
    jinja2

commands =
    pytest -n auto {posargs}

# pytest configuration
[pytest]
testpaths =
    tests                            #relative path to the tests directory
addopts =
    --ignore-glob=tb/test_*.py
--import-mode importlib- The directory structure now looks something like this:
mac_manual
|   |   tox.ini
|
└───hdl
│   │   mac_manual.v
│   │   qadd.v
|   |   qmult.v
│
└───tests
    │   Makefile
    |   test_mac_manual.py
    |   results.xml
| mac_manual_cocotb.vcd- With that out of the way, let's move on the the actual testbench. First we'll need a couple of extra imports
#file:test_mac_manual.py

from cocotb_test.simulator import run
import pytest- Next, we'll write our meta-test using the run function we just imported...
#file:test_mac_manual.py
#IMPORTANT NOTE: The name of this python test file should begin with 'test_' for pytest
#								 to automatically pick it up as a valid test function.

tests_dir = os.path.abspath(os.path.dirname(__file__)) #gives the path to the test(current) directory in which this test.py file is placed
rtl_dir = os.path.abspath(os.path.join(tests_dir, '..', 'hdl')) #path to hdl folder where .v files are placed

@pytest.mark.parametrize("N,Q", [(16,12), (32,27)]) #all the relevant configurations of N and Q
def test_axi_adapter(request, N, Q):
    dut = "mac_manual"
    module = os.path.splitext(os.path.basename(__file__))[0] #The name of this file
    toplevel = "mac_manual"

    verilog_sources = [
        os.path.join(rtl_dir, "mac_manual.v"),
        os.path.join(rtl_dir, "qadd.v"),
        os.path.join(rtl_dir, "qmult.v"),
    ]

    parameters = {}  #The run function needs you to pass parameters as a dictionary of
										 #possible values
    parameters['N'] = N
    parameters['Q'] = Q

    extra_env = {f'PARAM_{k}': str(v) for k, v in parameters.items()}

    sim_build = os.path.join(tests_dir, "sim_build",
        request.node.name.replace('[', '-').replace(']', ''))

    run(
        python_search=[tests_dir], #where to search for all the python test files
        verilog_sources=verilog_sources,
        toplevel=toplevel,
        module=module,
        parameters=parameters,  #parameter dictionary
        sim_build=sim_build,    #directory where all the resulting test reposr will be stored
        extra_env=extra_env,    #these are the environment variables that pytest
			                   #these can be accessed from within the tests too.
    )
The important thing to see here is the parameterization. In the above code:
@pytest.mark.parametrize("N,Q", [(16,12), (32,27)])This is giving two valid sets of values for the pair N and Q. So pytest will detect two possible tests and run them for you. What I mean by that is the test 'test1' (defined above) will be run two times, each time with a different set of (N,Q).
If for example you had given your parameters like this:
@pytest.mark.parametrize("N", [16,12,32])
@pytest.mark.parametrize("Q", [16,12,32])
the pytest would have run 9 tests for you each representing one combination of the above two variable N and Q ( (16,16),(16,12) ........ ). To check this, you can access these parameters from within the tests by using the os.getnev("PARAMN") or os.getenv("PARAMQ").
Once the tests are run, the sim_build folder (created by pytest inside the tests folder) contains the reports separately for each test in a conveniently named set of folders.
As mentioned earlier, we have only just gotten started and there's so much more we can do to improve our verification with (and even without) cocotb and its features. In the next article, I'll be exploring other features like Drivers, Monitors, Testfactory, scoreboards and CI/CD integration among other things. Stay tuned!