
Instructions for accessing chiprentals PYNQ-Z2 hardware

This page will contain all the details and instructions that you need to access and use the PYNQ-Z2 development board in a chiprentals environment. The PYNQ-Z2 is an excellent board for those looking to explore topics like AI acceleration through custom chips. It is one of the most popular FPGA boards in the market at the moment because it provides a great baseline for beginners to get started with using FPGAs and realizing their power in a real world environment.
The first time you’re visiting this page. It might be simpler to watch this walkthrough video
IMP:We are collecting feedback on the user experience with this service. Please take a minute to fill this form so that we can immediately fix what is needed.
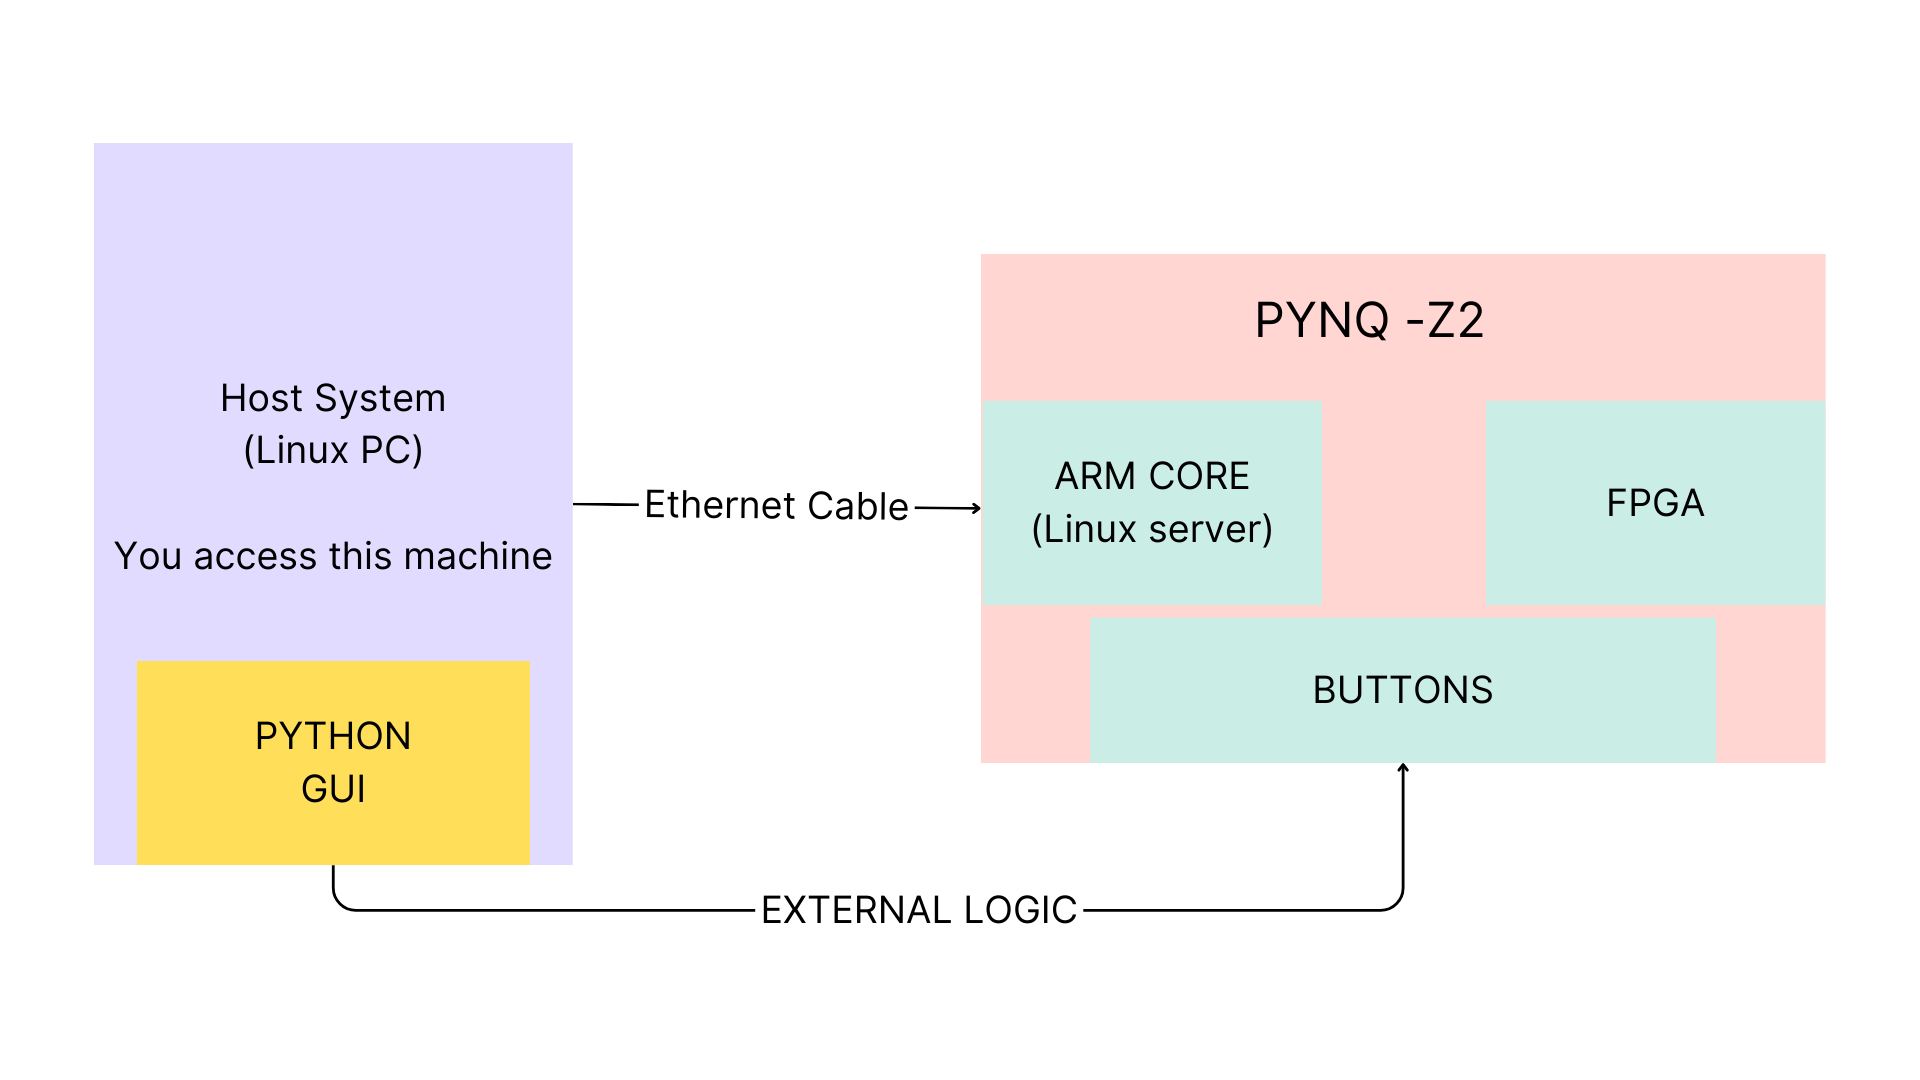
Here is a simple diagram of the system you are accessing
Scheduling, payment and slot booking
We use the service Calendly for scheduling. Users can use this interface to see when the PYNQ system is free and reserve a slot. This interface also has a payment system integrated where you can pay via Paypal. You can visit the booking page from this link
NOTE: Due to some payment restrictions we are unable to process payments from India at the moment. Given enough interest in the service, we guarantee our Indian users that this will be fixed in a few weeks time.
Accessing the Hardware
Using VNC
- Once the Booking and Payment is done, you can log-in to a vnc server at this link
-
This interface provides a Visual display of the host system. Users can use vivado and vitis GUIs and also be able to open the webcam and interact with the on-board buttons and switches via the UI. The display will render within the browser and you don't have to install anything.
Authentication
- Upon visiting the link, you will be asked to authenticate using the same E-mail ID that you had used at the time of booking. (The EMAIL code can sometimes take a minute or two to reach you).
- After authentication, use the following credentials: user: pynquser passwd: pynqz2
Viewing the hardware
- This step is as simple as typing in the command ‘cheese’ in the linux terminal. That should open up a window showing you the PYNQ-Z2 board.
-
Using the buttons and switches through the UI
use the command ‘pynqgui’ to launch a window that let’s you control 4 buttons and 2 switches on the pynq board. Support for more peripherals will be added very soon.
IMP: Do note that the system automatically kills the active user session once the booked slot duration is complete. Make sure to repeatedly backup your work and files, preferably to a github repository. Also delete the local repositry as you go since the people accessing the system after you can see your code otherwise. We take no responsibility of any sensitive code that you may have left behind.
As of today, there is no feature to extend a session. We will soon work on adding it.
Other Details
-
The PYNQ-Z2 can boot has the facility to boot up in three modes, SD Card, SPI Flash and JTAG. a. You might have seen people most commonly use the board in the SD card boot mode. This mode automatically brings up the ARM core with Linux running on it and let's use use the system by logging into into it via SSH or the Jupyter Notebook. b. The JTAG mode on the other hand is used to go full baremetal. i.e build the FPGA and ARM image from scratch and use tools like Vitis SDK to write code and debug via the USB Serial Port. c. SPI Flash mode is only used when the board is deployed in the field. Not much for hobbyist projects.
Currently the board is booted up in the SD card mode and the user has no option to change this since that requires one to manually change the jumper position and power cycle the board. We took this call because the SD card mode seems to give easy access for beginners, to the largest set of features this board has to offer. If you think you would rather use the board like a traditional Zynq system in the JTAG mode, let us know via the feedback form.
-
List of Useful Resources:
Resource Link PYNQ official documentation LINK PYNQ Community Forumn LINK Zynq SOC Technical Reference Manual LINK Zynq SOC Datasheet LINK PYNQ Z2 schematic LINK Good First Projects LINK1 , LINK2 , LINK3 , LINK4 Xilinx ILA over Ethernet LINK
Debug section:
Following are the FAQs for common issues. If you're stuck with something feel free to approach the Discord Community with your question.
-
The buttons UI got closed, how do I re-open it.
- use this command to re-open it:
pynqgui -
The VNC session is not able to connect. What do I do
Sometimes the Access can take a few minutes to reflect your email. Try again after some time.
-
I had connection/authentication issues and could not use the service. What do I do.
Try the debugging steps provided. If nothing works, write to us at ‘thedatabus.io@gmail.com’ and we will issue a refund if it was an authentic case.
-
I don’t know how to use Vivado, where can I get started?
- Watch the first time tutorial video or guide to get a clear picture of what we are working with here. Once you have this idea, you can follow the linked resources to learn further.
-
I don’t know the first thing about FPGAs, where can I get started?
- Watch the first time tutorial video or guide to get a clear picture of what we are working with here. Once you have this idea, you can follow the linked resources to learn further.
-
Is there a recommended list of projects that I can do to get myself accustomed to using this environment?
You should ideally start with this project.
-
I want to transfer files from my local PC to the chiprentals host machine, how can I do it?
The ideal way to do this is via a github repository. This method also ensures that once done with your project, you can easily back up your progress without losing any files.
- Maintain your files and projects in a github repository, upon getting access to the chiprentals system, you can clone your repository locally with a temporary personal access token. Make any changes, build the project and dump it onto the FPGA and then push changes to the same repository once your session is about to expire. This is a responsible and safe way of using public systems without exposing your code. With github allowing private repositories, this has become ever more foolproof.
-
There is low space on the disk for my project
Feel free to delete any code or repositories that do not belong to you. It was probably left behind by an irresponsible user. We take no responsibility of their work.
-
There is a weird black rectangle on my VNC screen that keeps obstructing me
Just use the command 'kilall xfce4-panel'
-
I just minimized a window and I can't see it anymore, how do I get it back
use ctrl + q to list all the open applications and select the one you need to bring it back up.
-
I want to use the PYNQ board via the Python overlay system
Just open up a browser in the host system and go to the IP 192.168.2.99:9090 . You should see a Jupyter Notebook login page. Use the password 'xilinx' to login. This will open up the standard interface you might have seen in many other tutorials.
-
I want to SSH into the linux server running on the ARM cores and write software over there:
Just open a terminal in the host system and do
ssh fpga-dev@192.168.2.99You can use the following user and password to login: User: fpga-dev Pass: pynqz2
- The Jupyter notebook says it's not able to connect to the terminal Just logout from the Jupyter page and log back in. It should go away.